Monday, October 18, 2010
I Love My MUMMY
I saw this cute idea for a halloween candy jar and had to make one...I love it, especially the eyes looking out under the bandages. Everyone needs one: buy a square glass canister with a lid......fill with candy (I put in halloween taffy) cut some strips of cloth about an inch wide.....glue on two google eyes.....wrap the cloth while securing here and there with a glue gun. I finished this off with a little sign attached with rafia that says, I love my mummy! So cute!
Friday, October 1, 2010
Autumn leaves
I love decorating for Fall. It is great because it is not only a season but there are two holidays that you can use alot of the same decorations. This year I made these fall leaves that I can spread down the table or put around the living room. They were so easy: Find some leaves that you like the size of in your yard. Put them on the copier and make yourself a pattern. Cut them out of different colors of felt (way cheap). Then sew the veins on your sewing machine. (if you don't feel comfortable eye balling it like me try drawing the lines with chalk first.) Voila, leaves........
Now we can sing "It's Autumn Time, It's Autumn Time,
the leaves are falling down"
Am I the only one singing?
Friday, September 24, 2010
I guess it's Fall
I love this time of year, especially the fall decorations. I tried a new idea for a pumpkin today and thought they were really cute and unique so here they are for all of you (probably two viewers) to see. All you need is a quarter yard of fall fabric, a toilet paper role, a 6"stick and some fall foliage.
Wednesday, September 8, 2010
Autumn Wreath
Okay, so the weather is awful. We had maybe two weeks of decent Summer weather, three days of fall and now it is winter so I am in my "let's do a fall project" mood. Here is the wreath I am working on. SOOO simple... and you can use whatever colors youd like to match the different holidays!
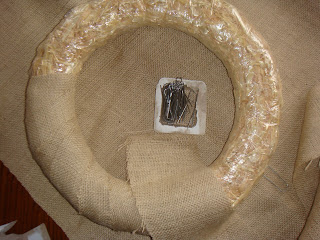
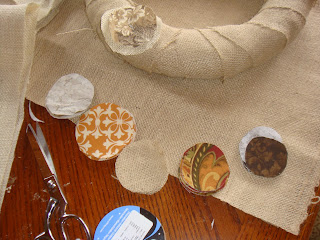
If you want to make one you will need a straw wreath (Ikept the plastic on) about 1/2 yard of burlap and 1/4 yard of 2 or 3 colors that you like. I used straight pins, greening pins and hot glue to attach everything. I also used an accent color of ribbon for the flower centers.
I attached a ribbon at the top of the wreath so it will hang easily. I am anxious to try this same idea in christmas fabrics. I hope you like yours!
Thursday, August 5, 2010
Having a project makes everything better!
Okay, I know I haven't written for awhile but I have had a busy summer so far. Fortunately I got sick and had to slow down a bit so since I was homebound I made a quilt. The quilt store was my first outing and I still wasn't myself and had no energy, so I gave the clerk my quilt pattern, the fabric selection and had her figure everything out while I sank down on their compfy overstuffed couch. $89 dollars and (I found out when I cut my fabric), way too much fabric aghhhhh, I was good to go with project in hand.
Babies go so well with flannel and of course this is for a baby boy. Can't wait to take it to the baby shower and of course I will blog about what I am doing with all of the excess fabric (I can't believe I trusted her in my vulnerability:)
Monday, June 21, 2010
Summer T-Shirt fun
I had this great idea to make "designer t shirts" for my teenage girls... It's SO simple, you can do it too!
To make your own designer T shirts start with 2 T-shirts (I got mine at Walmart for $4) one colored and one white. You will also need a bleach pen.
To make your own designer T shirts start with 2 T-shirts (I got mine at Walmart for $4) one colored and one white. You will also need a bleach pen.
Put a piece of plastic or cardboard inside your shirt to protect the back side before you begin. Decide what wording you want on the shirt and then begin writing with the small tip side of the Bleach pen. I let mine sit for about 15 minutes to set the color.
While it is sitting outline the letters that you want over the top onto your white t-shirt. Make them in block form so you can cut just inside of the lines drawn. I chose CTR which stands for "Choose The Right" in our church.
Some other ideas might include your childs initials or School acronym. Cut out the letters.
Now you can rinse the bleach out of your shirt with cold water then stick it in the dryer.
When the shirt is ready pin the letters on the T shirt wherever it looks good to you and with the underneath words. Sew a zigzag seam through the middle of the words.
When you are done sewing wet the shirt and throw it in the dryer so the edges will fray and curl.
TA DA...you have just made a designer T shirt!
I am giving my T shirts to my teenage daughters at their church camp this summer, one in blue and one in gray.......hope they like them. Have fun. Allison
Saturday, June 5, 2010
A New addition........the Night Owl Collection
 Introducing a new collection of decorative pillows. They come in families of coordinating colors (if there is a color scheme that you need just ask). These fun little guys kind of freak you out just sitting there all comfy staring at you but at second glance they are adorable. I can guarantee that you will want a set for the bench on you patio or on the guest bed. Any little niche would come to life with these little guys warming it up. If you you want one go to allioriginal on the etsy.com site and order what ever color you like.
The large pillow is 15" tall, medium 11" and the little guy is 8 1/2" tall. All three for $30. Individually, the large and medium are $15 and the little guy is $10. I hope you like them! Allison
Thursday, June 3, 2010
Today's Love
I love hand made jewelry... There is just something great about unique off beat pieces that can start a conversation. I found this great necklace on one of my favorite blogs... Little Birdie Secrets... you can find the tutorial here...
Really simple to make... try it! You may be good at it...
P.S. Making hand made jewelry can be pricey. You may wonder why handmade jewelry is so expensive, but the best materials are worth the sacrifice. There is something to say about creating exactly what you know will be perfect for your personality and style!
It's only just begun...
My mom loves to create beautiful things and we finally just got her to share them with the world! Her handcrafted jewelry is featured on Etsy and also Sassy Pose. Check 'em out an get 'em while they're hot!
This blog is a place for her to highlight ideas, and inspiration, and share her vision with the world... so BUCKLE UP... and here we go!
Subscribe to:
Posts (Atom)


